
Minibricks Background
This tutorial is sutible even for beginners. Using a Minibricks tile you can make the illusion of a continuous image for the backgrounds of your pages.
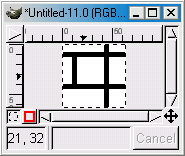
- Create a new file (64x64, white background).
- With the 'Pencil' tool, make two horizontal lines spaced by 32 pixels verticaly (one at 10 pixels, the second at 42 pixels). Make two vertical lines space by 32 pixels horizontally (one at 12 pixels that connects the two horizontal lines, the second at 44 pixels that goes down the entire length of the image).
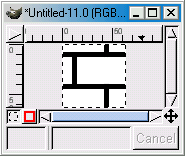
- With the 'Eraser' tool, carefully erase the part of the larger line that lies between the two horizontal lines.
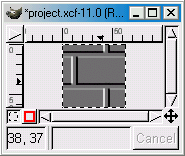
- Use the 'Emboss' filter (right click > Filters > Distorts > Emboss) Azimuth 25, Elevation 25, Depth 2.
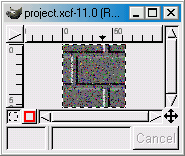
- Create a new layer above (Fill Type Transparent). Run the 'Hurl' filter (right click > Filters > Noise > Hurl). Randomization 50% Repeat 1. Then 'Flatten' the image (right click on layer > Flatten Image).
- Use the 'Gausian Blur (IIR)' (right click > Filters > Blur > Gausian Blur (IIR)) Blur Radius: 2 Horizontal & Vertical.
- Create a new layer above. Fill it with a bright red color. Change this layer's Mode to 'Multiply (Burn)'. Then 'Flatten' the image.
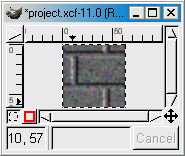
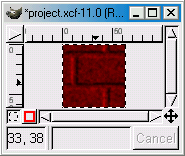
- Go back to the original image. Using the rectangular selection tool, select all of the image except the right and left two pixels.
- Copy & Past it into a new image. Save it again in your format of choice & save it into your pattern directory.
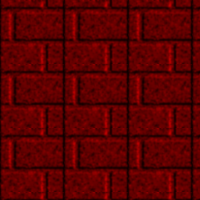
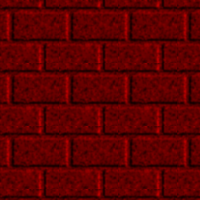
Here's what the final image should look like tiled. Oops where did that extra line come from? Lets try this again.
Submit to: ![]() Digg
Digg ![]() Del.icio.us
Del.icio.us
Related Links
Copyright © 1998-2006 Phillip Riley
Last Updated Sat Aug 11, 2007