Wooden Buttons & Background
This tutorial is sutible even for beginners. Wood buttons can add a little class to your website. You can make them in different sizes & shapes. You can make matching backgrounds, & photo windows.
- Create a new file (80x40, white background). Fill the foreground with a warm brown color.
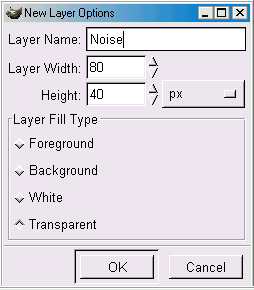
- Create a new layer, call it 'Noise' & make the fill type 'Transparent'.
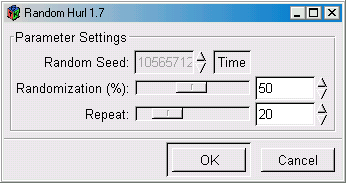
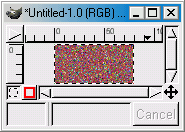
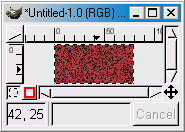
- With the noise layer selected use the 'Hurl' filter (right click image > Filters > Noise > Hurl) set the randomization to 50% and the repeat to 20.
- Adjust the color levels (right click > Image > Colors > Levels) adjust the input levels all the way to the right.
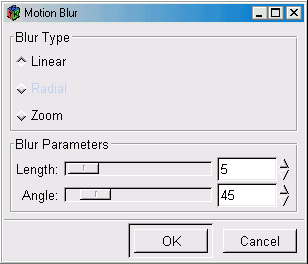
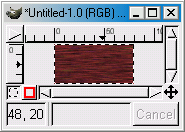
- Apply the 'Motion Blur' filter (right click > Filters > Blur > Motion Blur) set the blur type to linear, length 5, angle 45. Then merger the noise & backgroud layers.
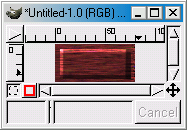
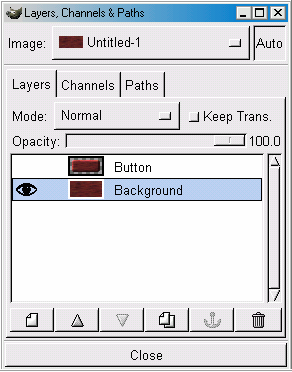
- Using the 'Rectangular Selection' tool, select an area five pixels from the edges of the image. Copy selection & create a new layer called 'Button' & paste the selection into the new layer.
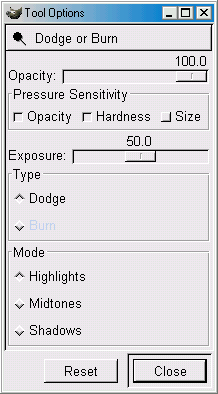
- Double click the 'Dodge or Burn' tool (it looks like a magnifying glass with the glass part colored in). Select the type 'Dodge' & mode 'Highlight'.
- Select a hard brush size 8 pixel. Click the upper-left corner of the image hold down on the shift key & click on the upper-right corner of the image. Repeat this process until you get the desired 'highlight'. Then do the same to the left side of the image.
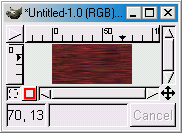
- Double click on the 'Dodge or Burn tool again, this time selecting 'Burn'. Click on the lower-left corner of the image hold down on the shift key & click on the lower-right corner of the image. Repeat this process until you get the desired 'shadow'. Then do the same to the right side of the image.
- Select a hard brush size 9 pixel. Click each corner of the image. This will give the corners of the buttons a nice rounded edge. This image can be used as-is for a good looking button.
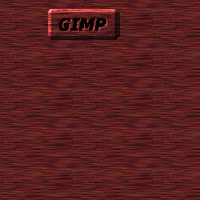
- To make a background image, turn off the 'button' layer by clicking on the 'eye' icon beside the layer's image then select the background layer.
- Offset the image by 40 pixels (right click the image > image > Transforms > Offset). Select the middle 1/2 of the image with the rectangular selection tool.
- Apply a 'Motion Blur' filter (right click > Filters > Blur > Motion Blur) Angle 0, Distance 6. This will smooth out the line that goes down the middle of the image.
- Apply a 'Destripe' filter (right click > Filters > Enhance > Destripe) Width 40. This will further smooth out lines.
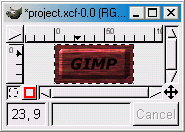
- To put text on the image, create a new layer then use the 'Text Tool' & write some text. Place the text on the image where you want it.
- Right click the 'Text Layer' & choose 'Alpha to Selection' then 'Feather' (right click > Selection > Feather) by one pixel. Make a new layer just below the this layer.
- Fill the selection with white. Use the move tool to move the white text down & right one pixel each. This makes a highlight. Change this layer's mode to 'Overlay'.
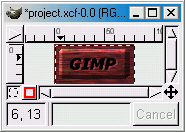
- Now you can save the button & background images seperately in your choosen image format.
- This is what your page will look like with the button & background:
- Make sure to save the background image into your pattern directory.

The result should look something like this:

The result should look something like this, with all the noise being black:
The result should look something like this:


Submit to: ![]() Digg
Digg ![]() Del.icio.us
Del.icio.us
Related Links
Copyright © 1998-2006 Phillip Riley
Last Updated Sat Aug 11, 2007